Flush trim router bit|Findbuytool
Flush trim router bits are versatile tools used in woodworking to trim or duplicate the shape of one workpiece to match another. They are commonly used for tasks like trimming laminates, veneers, or edge banding, as well as pattern or template routing. Choosing the right flush trim router bit and using it correctly can greatly improve the quality and precision of your woodworking projects. Here are some considerations and tips for selecting and using flush trim router bits effectively:
1. Bit Design:
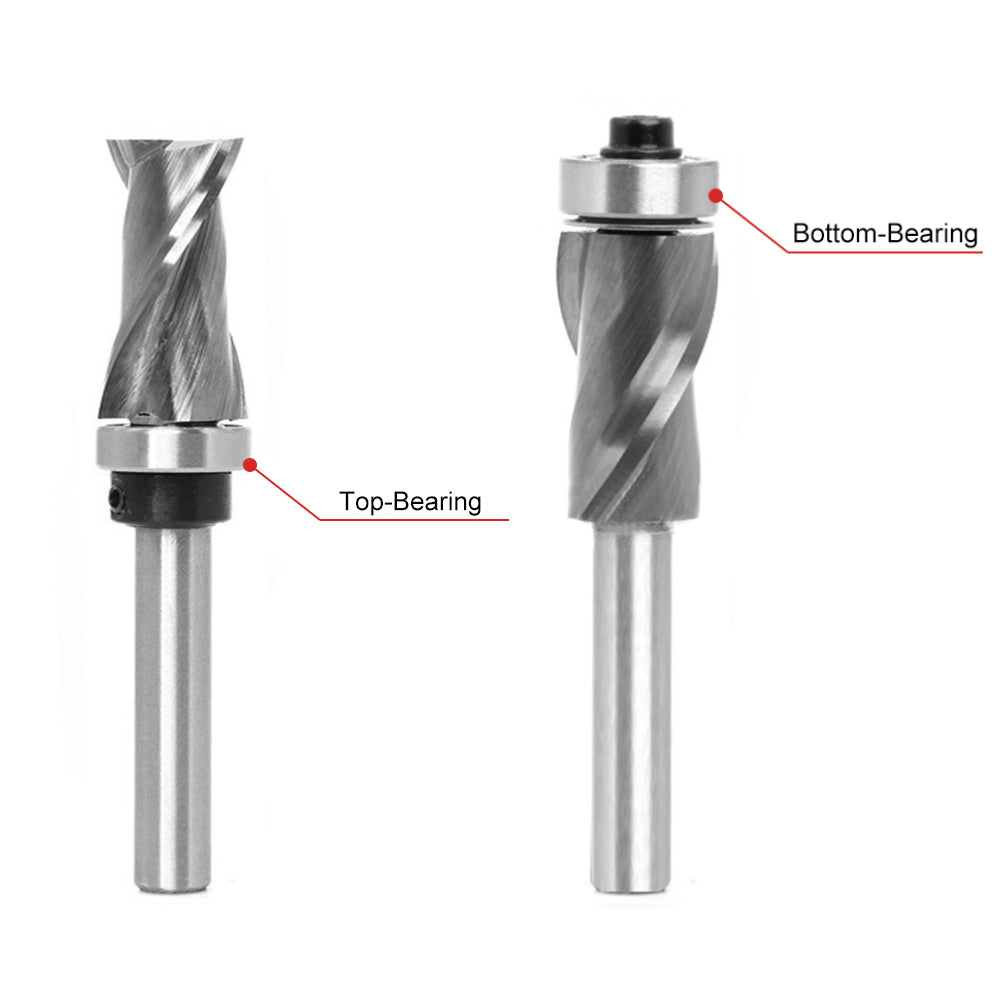
Flush trim router bits typically have a straight cutting edge with a bearing at the top or bottom. The bearing guides the bit along the reference surface, allowing the cutting edge to remove excess material and create a flush or identical profile. Consider the placement of the bearing in relation to the cutting edge. Top-bearing bits are ideal for trimming the edges of workpieces, while bottom-bearing bits are better suited for following templates or patterns.
2. Bit Size:
Choose a flush trim router bit with a cutting length that matches the thickness of the workpiece you'll be trimming. The cutting length should be at least as long as the widest part of the profile you need to trim. This ensures that the bit can reach and trim the entire surface accurately.

3. Bit Quality:
Invest in high-quality flush trim router bits made from durable materials like carbide. These bits maintain their sharpness for longer periods, resulting in cleaner cuts and longer tool life. Cheaper, lower-quality bits may dull quickly and can leave a rough or inconsistent finish.
4. Router Compatibility:
Ensure that the shank size of the flush trim router bit matches the collet size of your router. Common shank sizes are 1/4 inch (6.35mm) and 1/2 inch (12.7mm). Using a bit with the wrong shank size can lead to poor performance, instability, or even damage to the router.
5. Direction of Cut:
Pay attention to the direction of cut when using a flush trim router bit. The bit should rotate in the same direction as the bearing is moving along the reference surface. This ensures that the cutting edge is properly engaged with the workpiece, resulting in smooth and accurate trimming.
6. Multiple Passes:
When trimming thicker materials or making deep cuts, it's often better to make multiple shallow passes rather than trying to remove all the excess material in one pass. This approach reduces the load on the router and provides better control over the cutting process, resulting in cleaner results.
7. Grain Direction:
Consider the grain direction of the workpiece when using a flush trim router bit. If you're trimming the edge of a board, for example, it's generally best to feed the workpiece against the rotation of the bit to minimize tear-out. However, if you're trimming the end grain, it may be more effective to feed the workpiece in the same direction as the bit rotation.
8. Secure Workpiece and Router:
Ensure that the workpiece is securely clamped or held in place before starting the trimming process. This prevents movement or shifting during the operation, which can lead to inaccurate cuts or even accidents. Additionally, make sure the router is firmly and correctly mounted in the router table or handheld router base for stability and control.
9. Test Cuts:
Before trimming your final workpiece, it's a good practice to make test cuts on scrap material. This allows you to fine-tune the router bit height, feed rate, and other settings to achieve the desired result. It also helps you identify any potential issues or adjustments needed before working on the actual project.
10. Safety Precautions:
Always prioritize safety when using a flush trim router bit. Wear appropriate safety gear, such as safety glasses, hearing protection, and a dust mask. Follow the manufacturer's instructions and guidelines for your specific router and bit. Take your time and work with a steady hand to maintain control throughout the cutting process.
By considering these factors and following these tips, you can choose and use flush trim router bits effectively for precise, clean, and professional-looking trims and duplicates in your woodworking projects. Remember to practice proper technique, take your time, and prioritize safety for the best results.